Canvas
The canvas feature in Discourse Graph provides an interactive visual workspace for creating and connecting discourse nodes and relations. Built on top of tldraw, it allows you to visually map out discourse structures with drag-and-drop functionality, adding other visual elements like texts, scribbles, embeddings, and images.
Creating a new canvas
Using the command palette
- Open the command palette (
Cmd/Ctrl + P) - Search for “Create new Discourse Graph canvas”
- Press Enter to create a new canvas
 The canvas will be created in your configured canvas folder (default: the vault root) with a timestamp-based filename like
 Canvas-2025-01-15-1430.md.
Opening and viewing canvas
Opening a canvas
- Open the file of the canvas
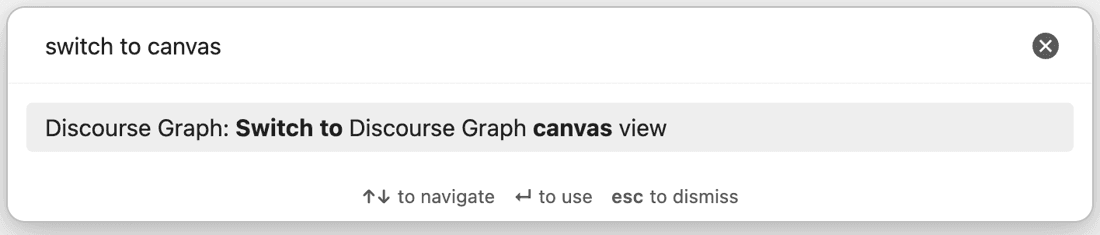
- In case the file is still in markdown format, you can open the canvas mode by either
Using the command palette
 Or click on the canvas icon at the top right corner
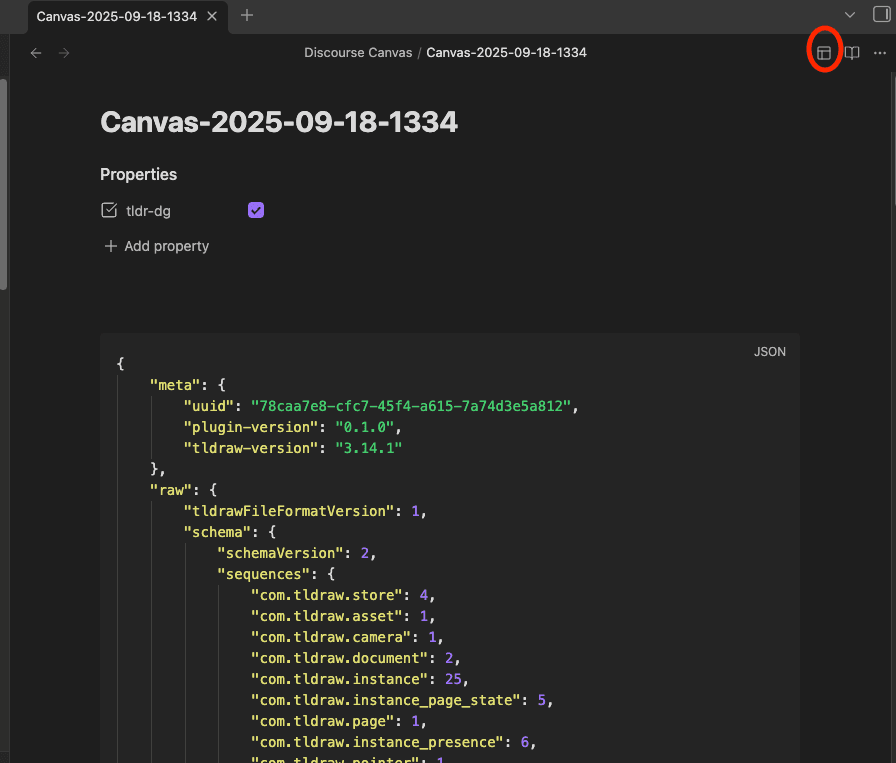
Do not hand-edit the generated canvas data block inside a canvas file. Hand edits to that block can make the canvas unreadable. Text outside the block is safe to edit. See Avoiding data loss.
Discourse nodes
You can add discourse nodes to a canvas in several ways. Most flows open the Create discourse node modal, where you can create a new node or search for and select an existing one.
Add a discourse node to canvas
- Click the Discourse Graph icon in the bottom toolbar
- In the panel on the right, click a node type to select it (or drag a node type onto the canvas)
- Click on the canvas where you want the node
- In the Create discourse node modal, enter the title, confirm the node type, and click Confirm The new node appears on the canvas as a discourse node card linked to the note that was created.
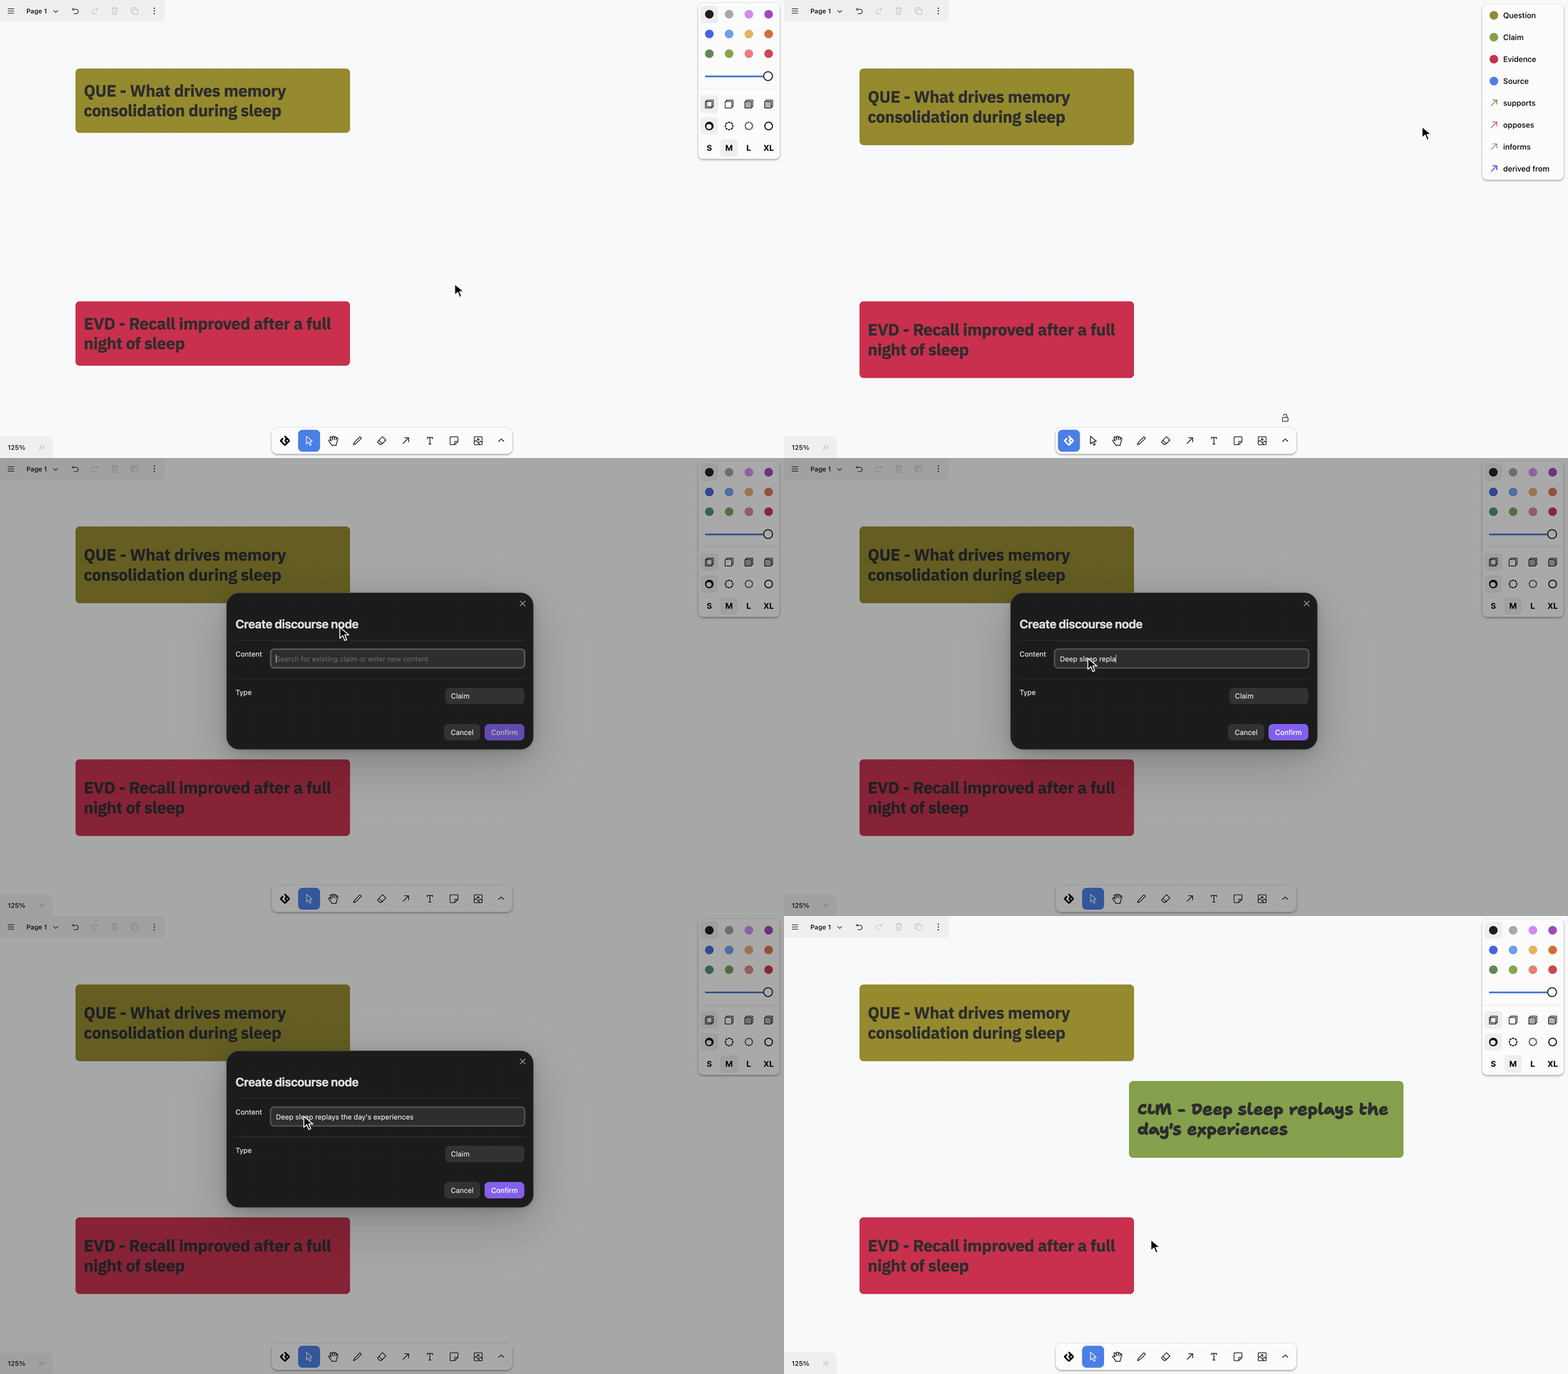
- You can also search for existing node from this modal and insert it to the canvas
Add an existing node
By dragging onto the canvas
Only notes that are already discourse nodes (with a configured nodeTypeId in frontmatter) can be dropped. If the same node is already on the canvas, the existing card is selected instead of duplicating it.
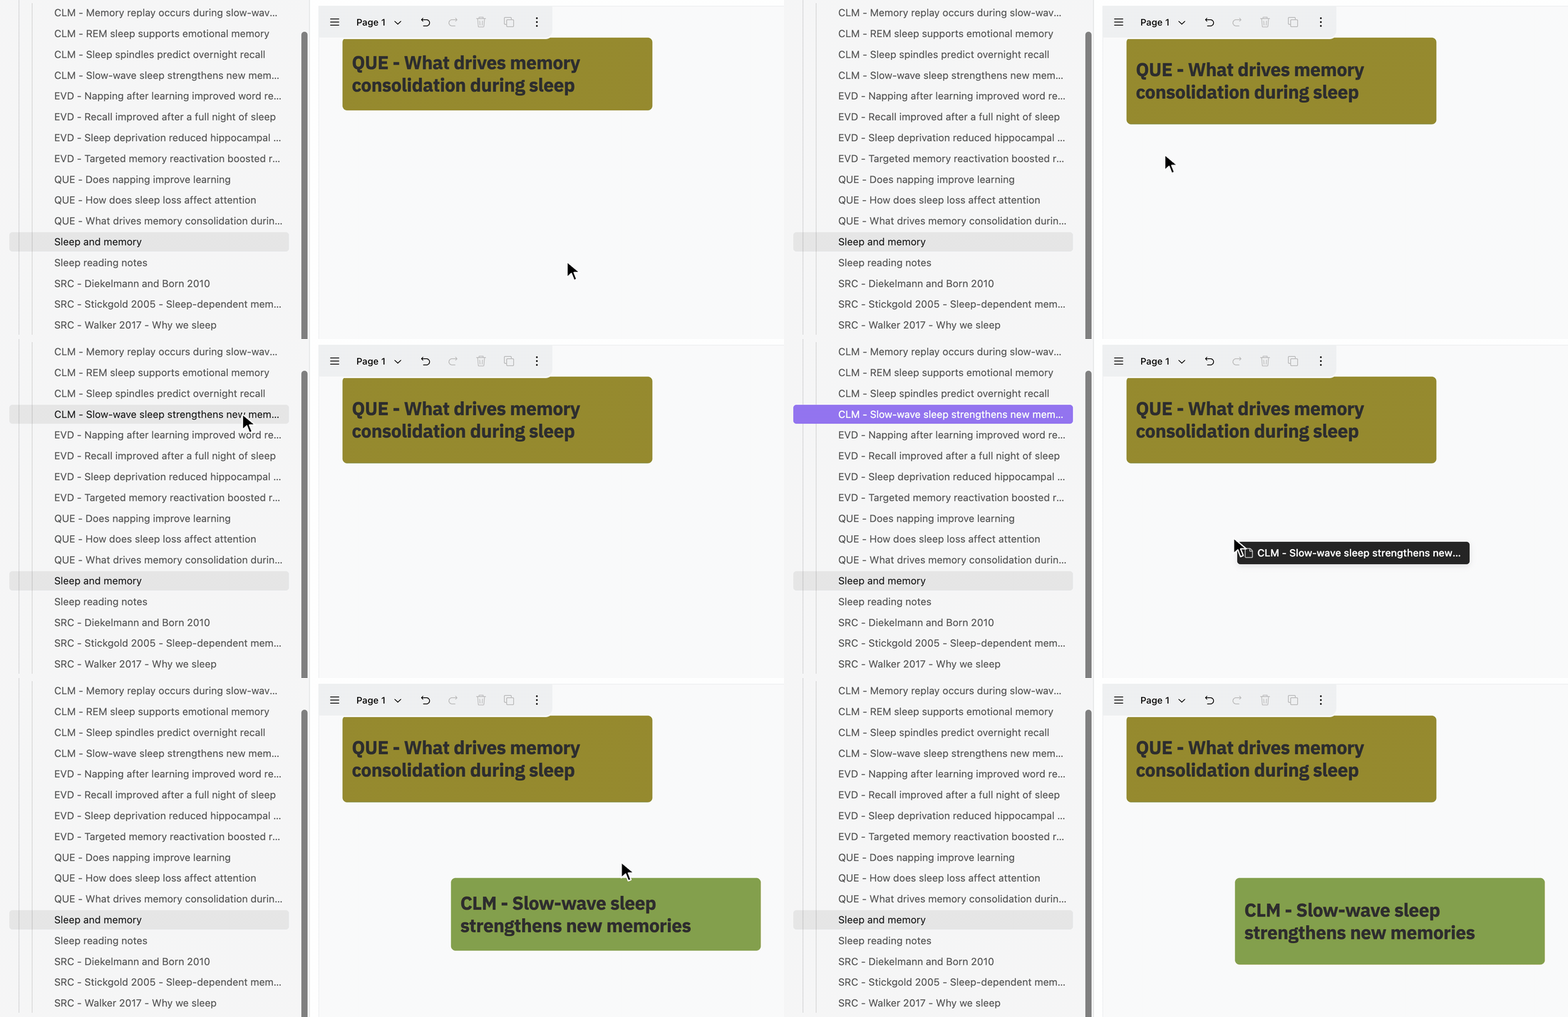
From the file explorer
- In the Obsidian file explorer, drag a discourse node note onto the canvas
- The node is added at the drop location
From the editor
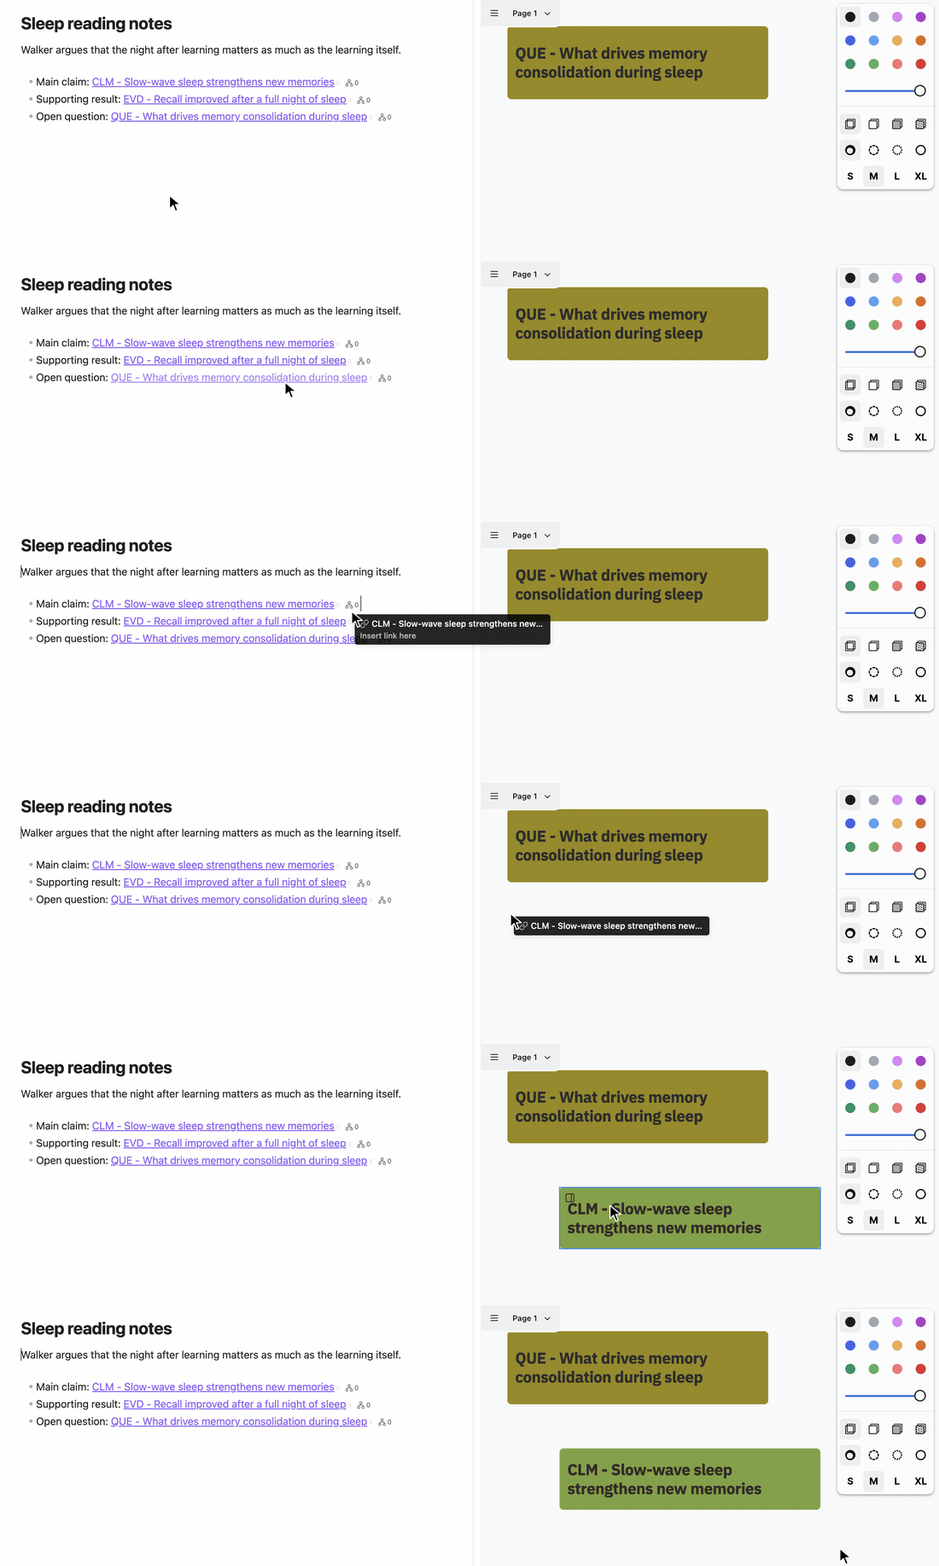
When a Discourse Graph canvas is open, internal links in Live Preview show a small drag handle (⠿) after the link.
- In a note, find a wikilink or markdown link to a discourse node (for example
[[CLM - My claim]]) - Drag using the handle next to the link
- Drop onto the canvas
The handle appears for [[wikilinks]] and [markdown links](path.md) that point to notes in your vault. It does not appear on image embeds (![[...]]).
Convert text or image shapes into a node
Turn tldraw text or image shapes into discourse nodes without leaving the canvas:
- Select a text or image shape on the canvas
- Right-click the shape
- Choose a node type from the Convert to submenu
- In the modal, edit the title (text is pre-filled; images start with an empty title) or search for an existing node
- Click Confirm — the shape is replaced with a discourse node card
Discourse relations
Create new relations between nodes
- Click the Discourse Graph icon in the bottom toolbar
- In the panel at the top right, click the relation type you want to create between two nodes
- Click and drag the arrow from the source node to target node
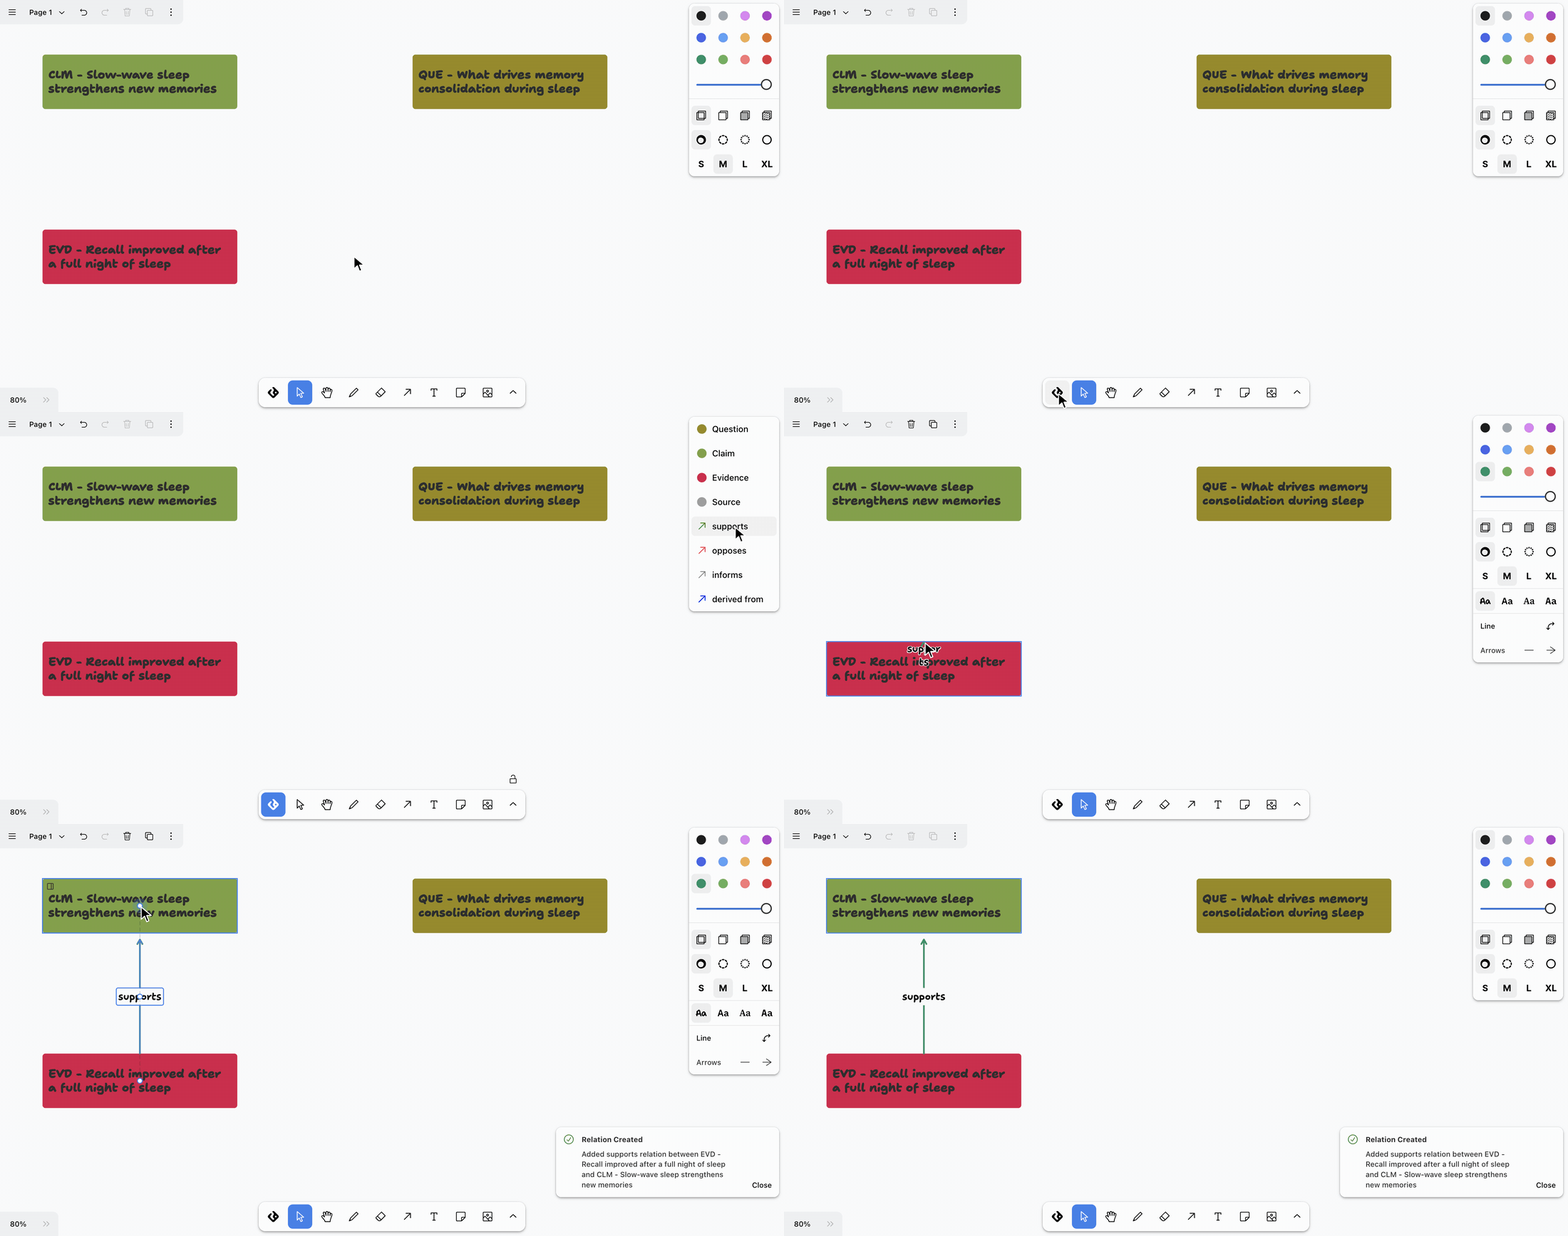
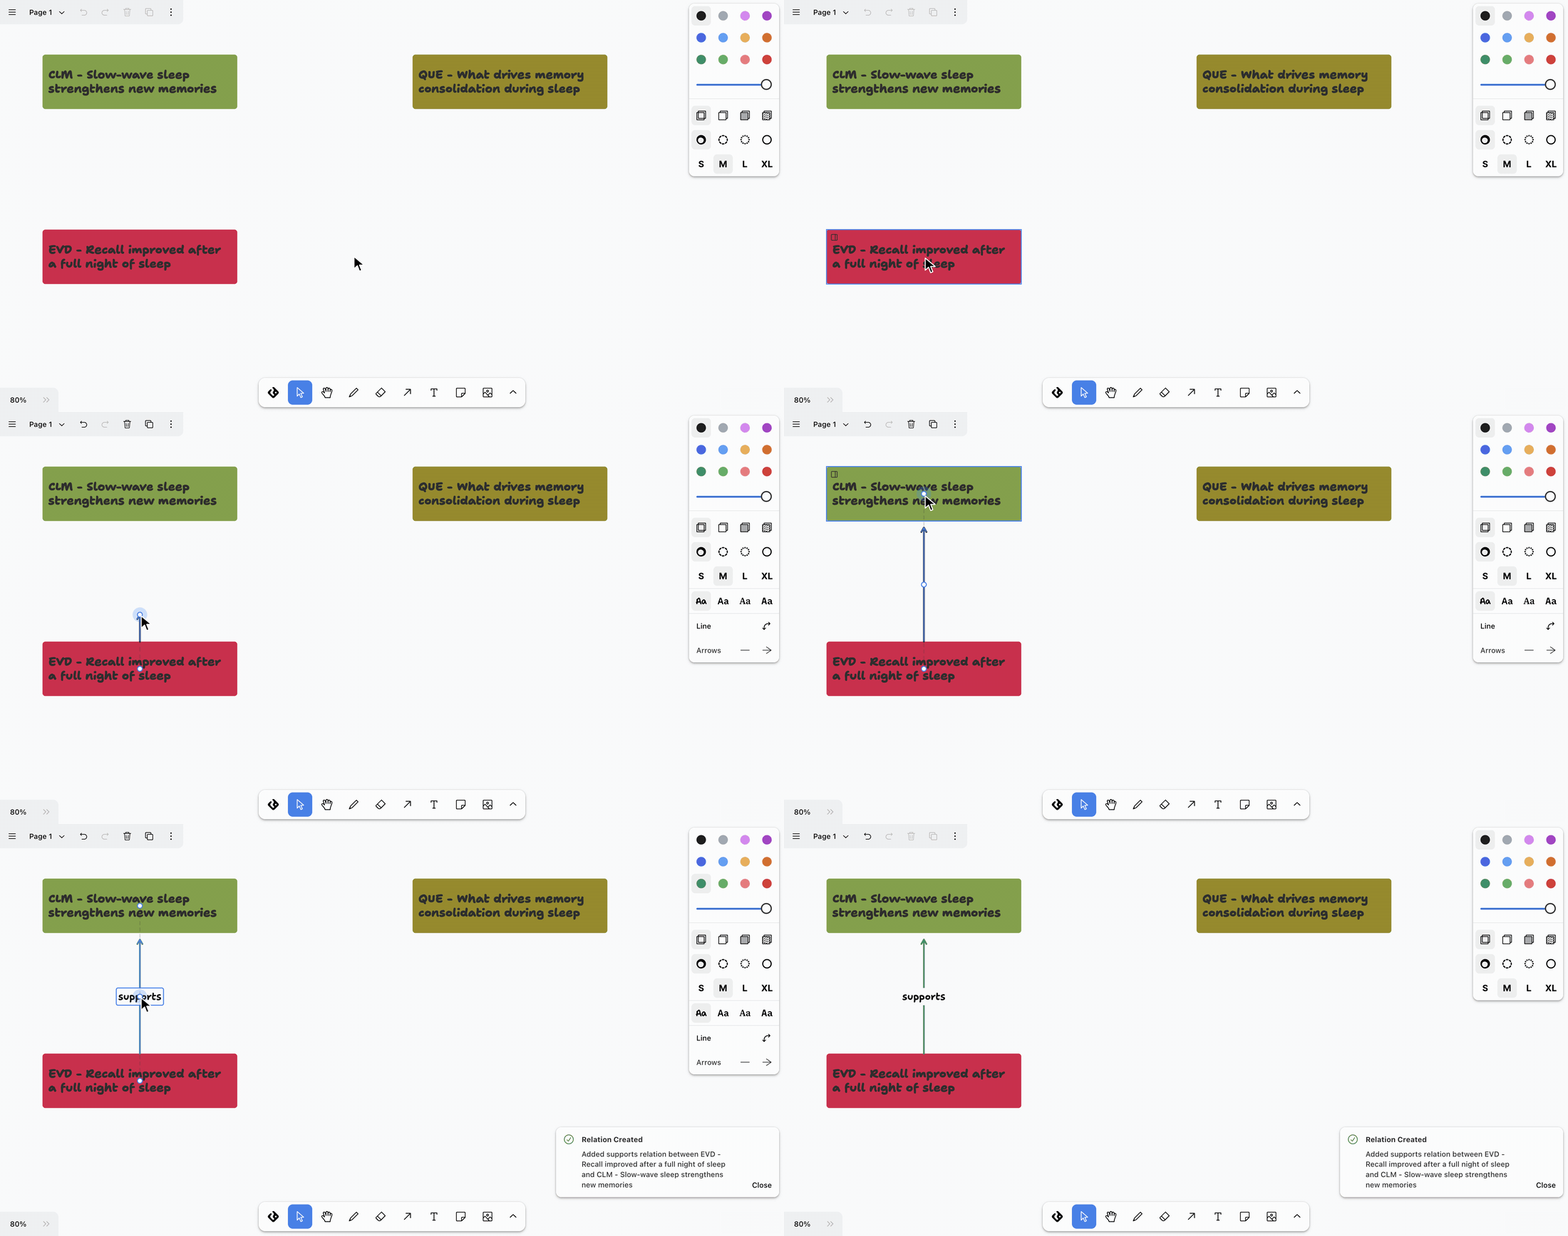
- Alternatively, you can select the dots that show up when you click a node, then start dragging to the destination node to create a new relation
When you drag from the dots and drop on another discourse node, the Relation type menu opens. It lists the relation types defined for these two node types. Click one to apply it to the arrow.
Add a relation type from the canvas
You don’t need to leave the canvas when no relation type is defined for the two node types you’re connecting, or when the one you need is missing.
- Drag from the dots of a discourse node to another discourse node.
- In the Relation type menu:
- If no relation type is defined for these node types, the menu shows Add existing… and Create new right away.
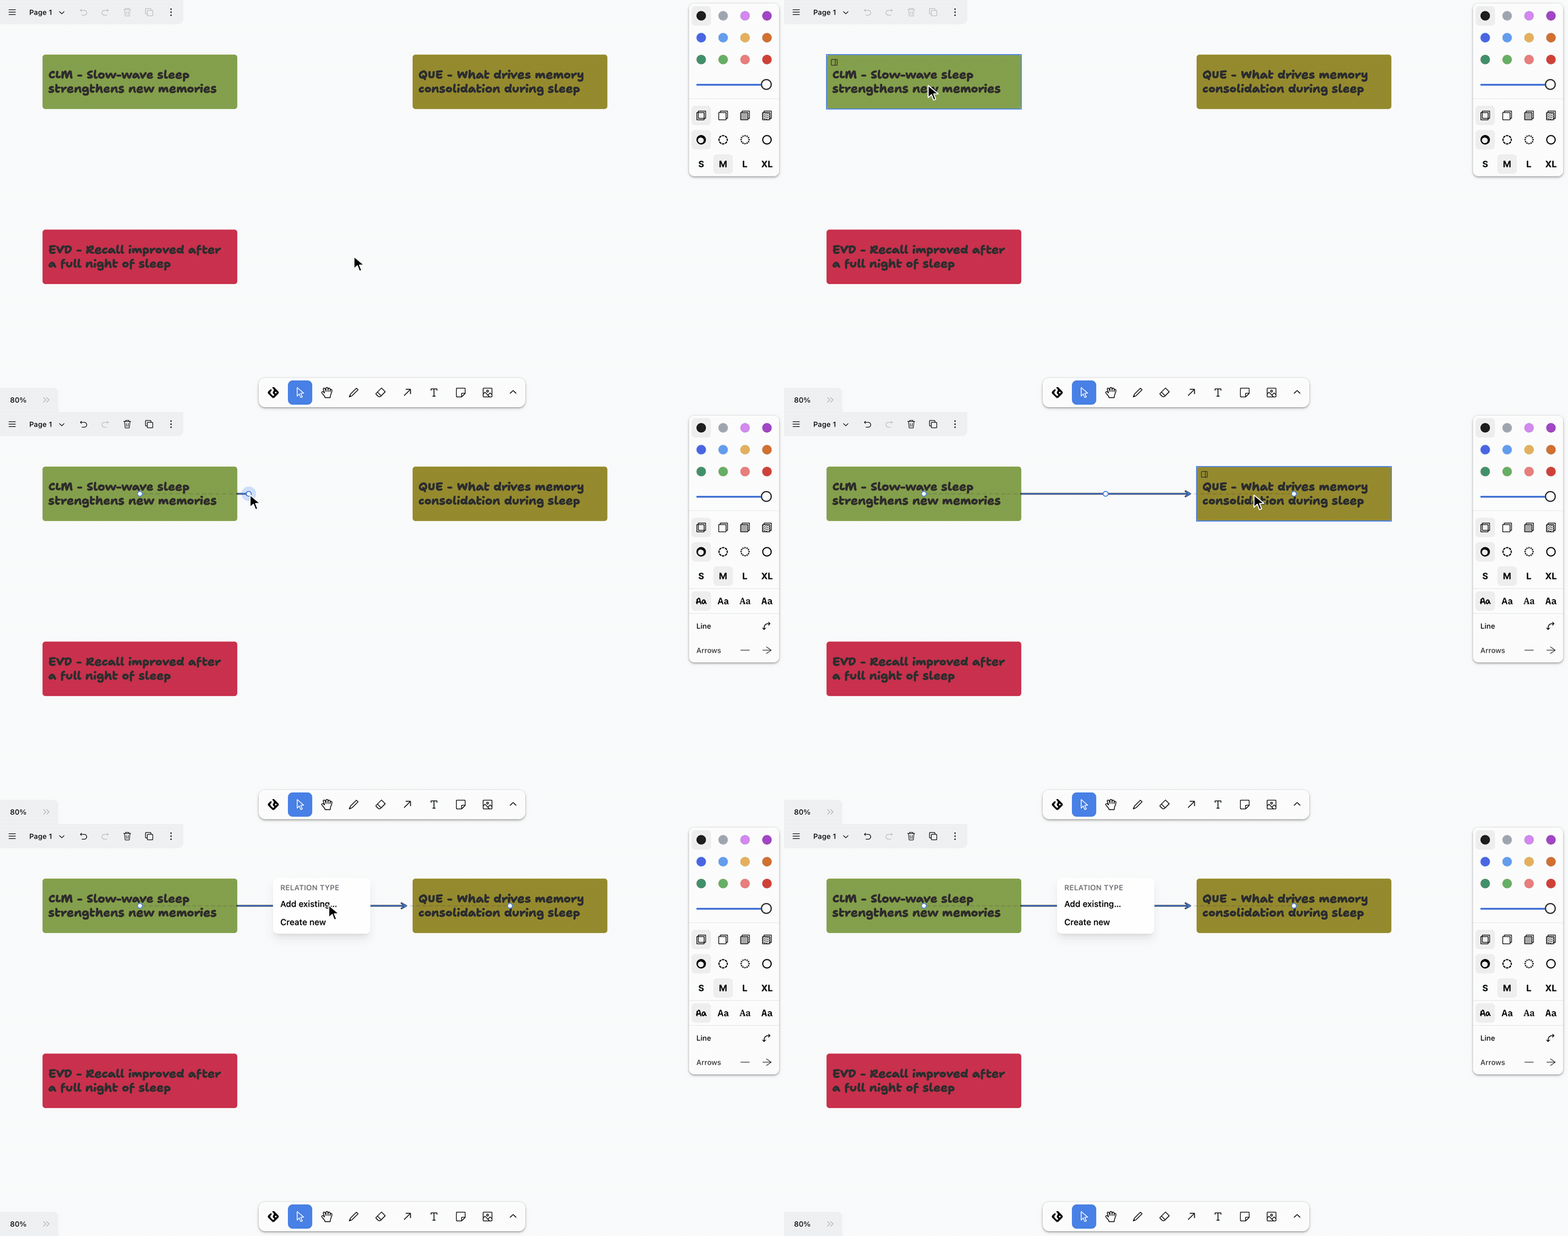
- Otherwise, click the + button next to the Relation type heading to see the same two options.
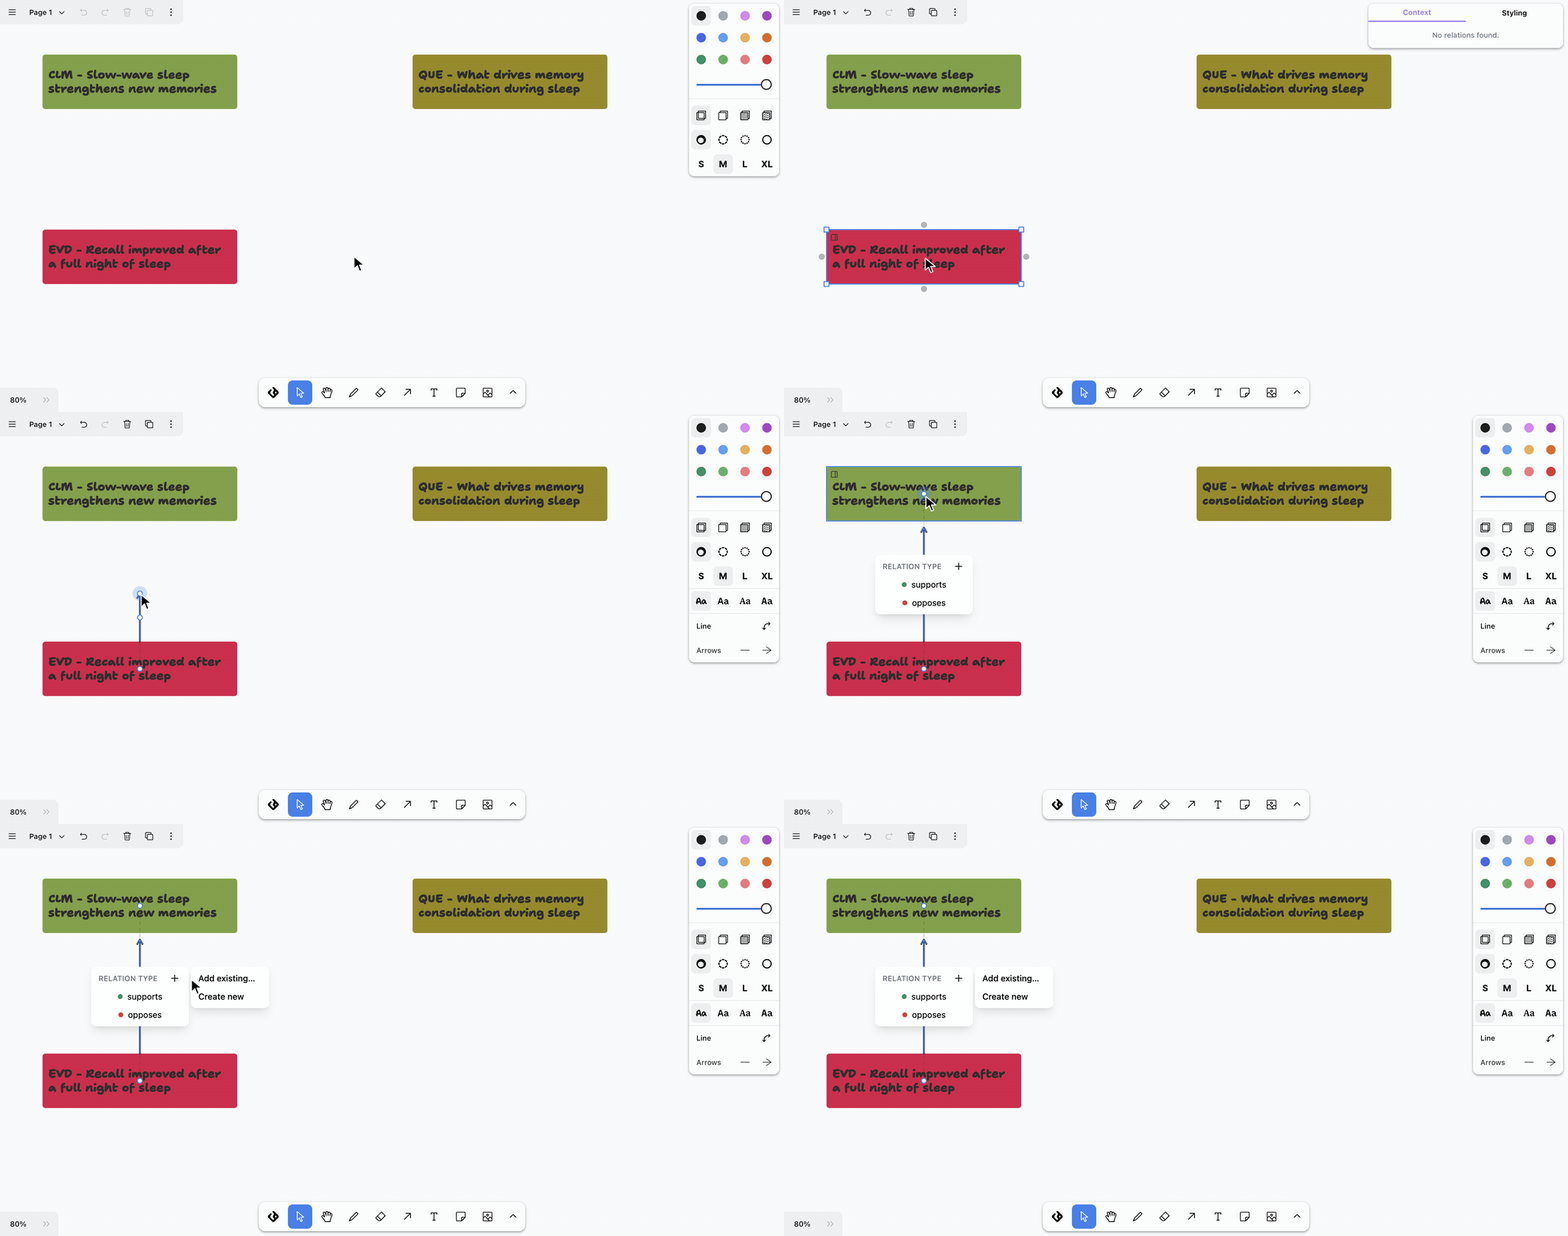
- If no relation type is defined for these node types, the menu shows Add existing… and Create new right away.
- Choose one of the options:
- Add existing… lists the relation types that aren’t yet allowed between these node types, shown as
label / complement. Click one to allow it for these node types. If every relation type is already allowed, the list says so.
- Create new opens the Add relation type dialog. Enter a label (for example, “supports”) and a complement (for example, “is supported by”), pick a color, then click Continue. Labels and complements must be unique across your relation types.
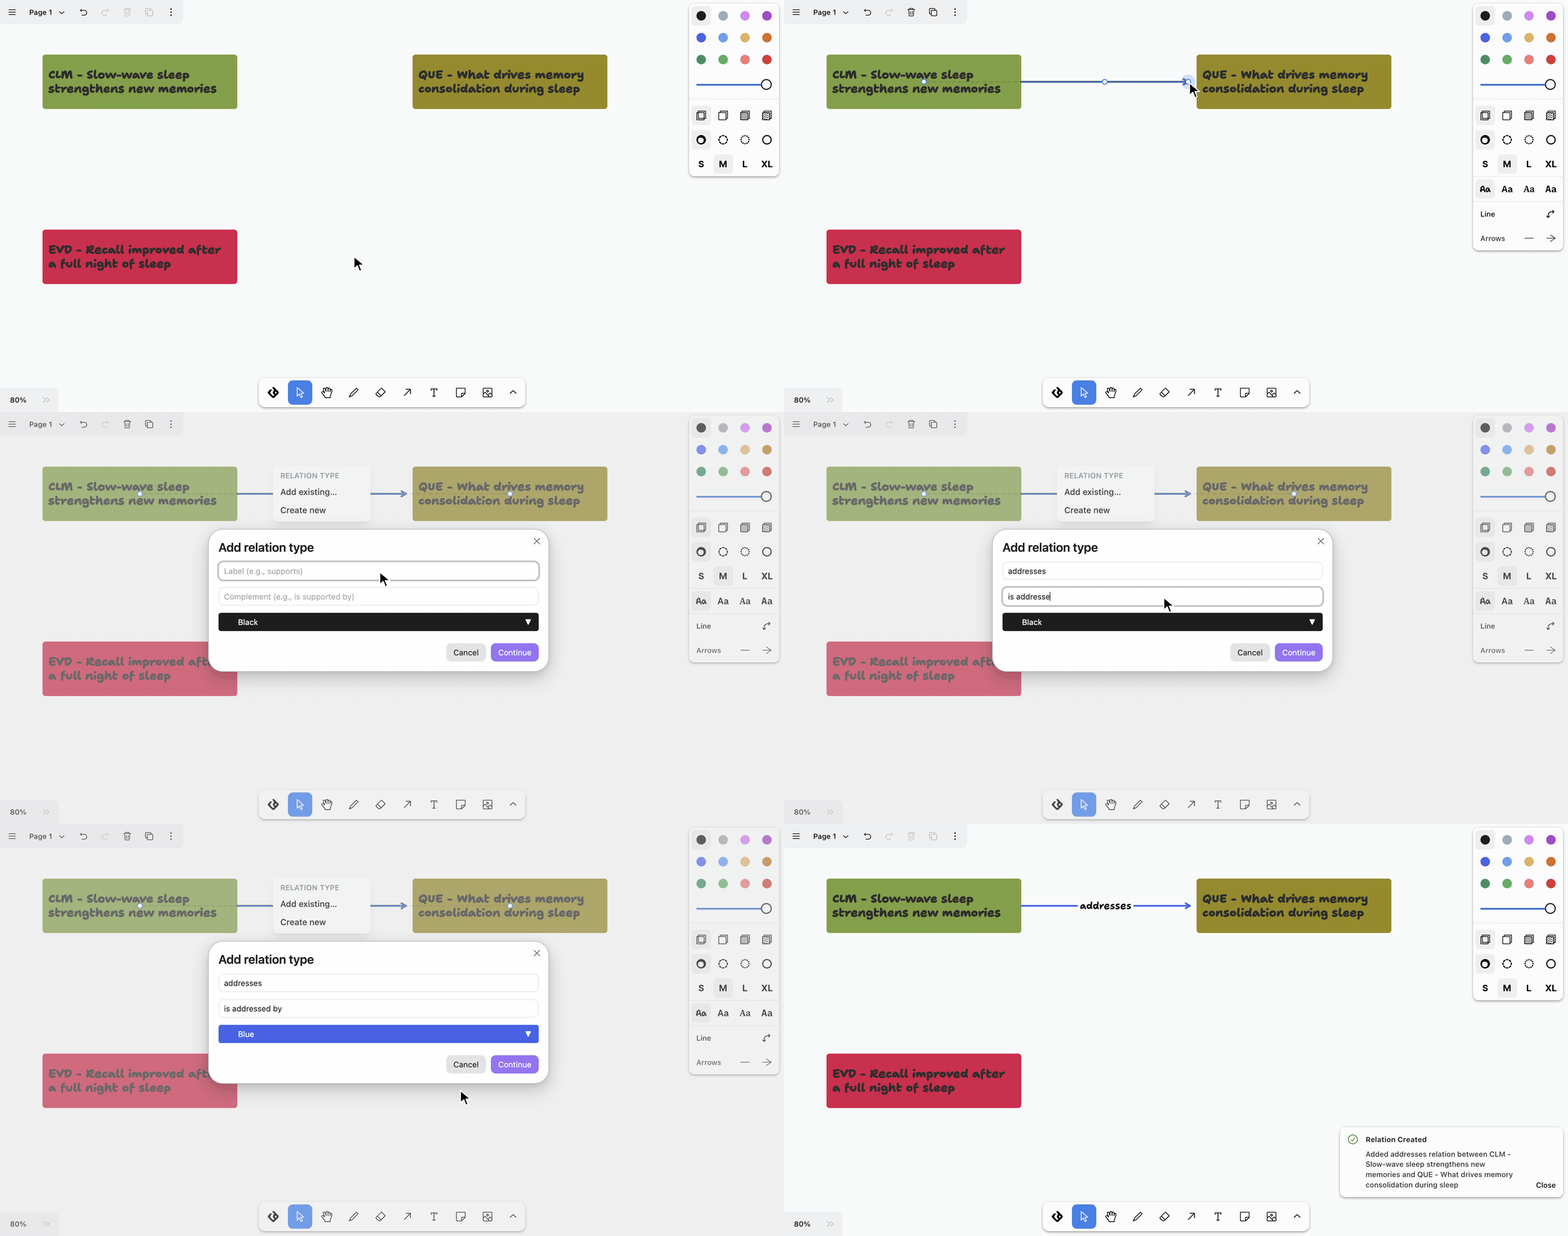
- Add existing… lists the relation types that aren’t yet allowed between these node types, shown as
- A Discourse relation added message confirms the change. If you created a new relation type, you’ll also see Relation type created.
- The relation type now appears in the Relation type menu. Click it to apply it to the arrow.
The relation type is allowed from the source node type to the target node type, in the direction you drew the arrow. Both changes are saved to your relation type settings, so you can edit them there later.
Both ends of the arrow must be discourse nodes with a node type. Clicking
outside the menu removes the arrow you were drawing. Esc first steps back
out of Add existing… or the + options, then removes the arrow.
Adding existing relations
- Click on the discourse node you’re trying to add existing relations of
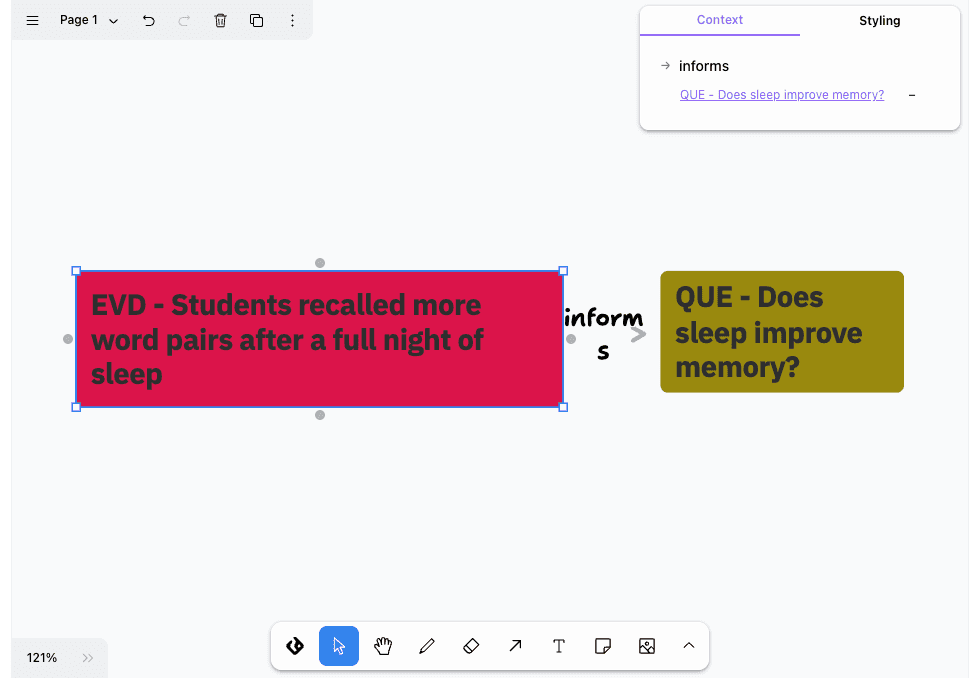
- In the panel at the top right, open the Context tab. You’ll see all the relations that this node has
- Click on the ’+’ or ’-’ to add or remove these relations on the canvas
- For relations whose target discourse node isn’t on canvas yet, it will be added to the canvas along with the relation
- Removing a relation from the canvas does not delete the relation itself
- Open the Styling tab to change the node’s color, size, and other styles
Canvas features
Key figures
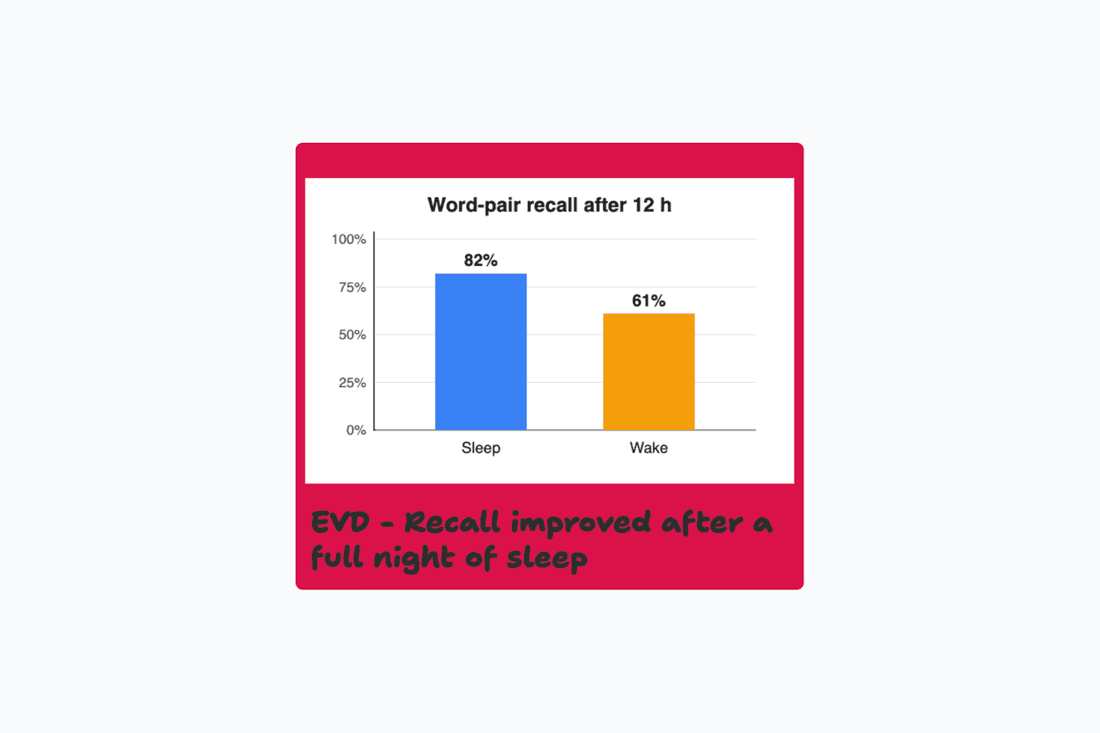
You can show the first image from a node’s file on its canvas card. To turn this on for a node type, open Settings → Discourse Graphs → Node types, click the node type, and turn on Key image (first image from file).
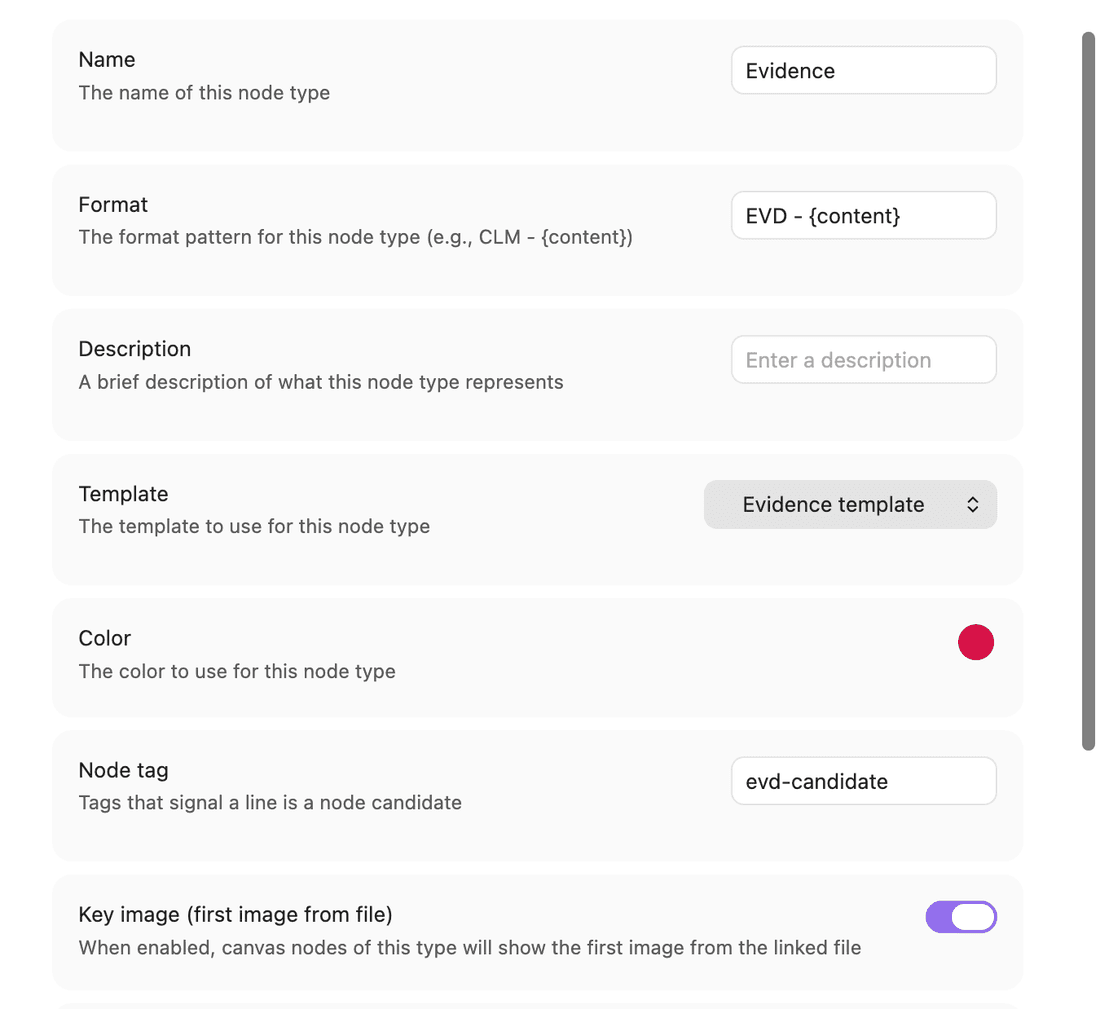
Then you will see the image show up if any is present in the file.
Open discourse node files
- To open a discourse node to the side panel, you can press Shift + Click, or click on the sidebar icon when hover on discourse node.
- To open file to a new tab, you can press Cmd + click on the file
Auto-save
- Changes are automatically saved to the markdown file
- No manual save required
- File updates preserve the markdown structure and block references
- An open canvas also watches its file, so changes written by another tab, another device, or a sync service are merged in as they arrive. See Avoiding data loss for the cases this cannot cover.
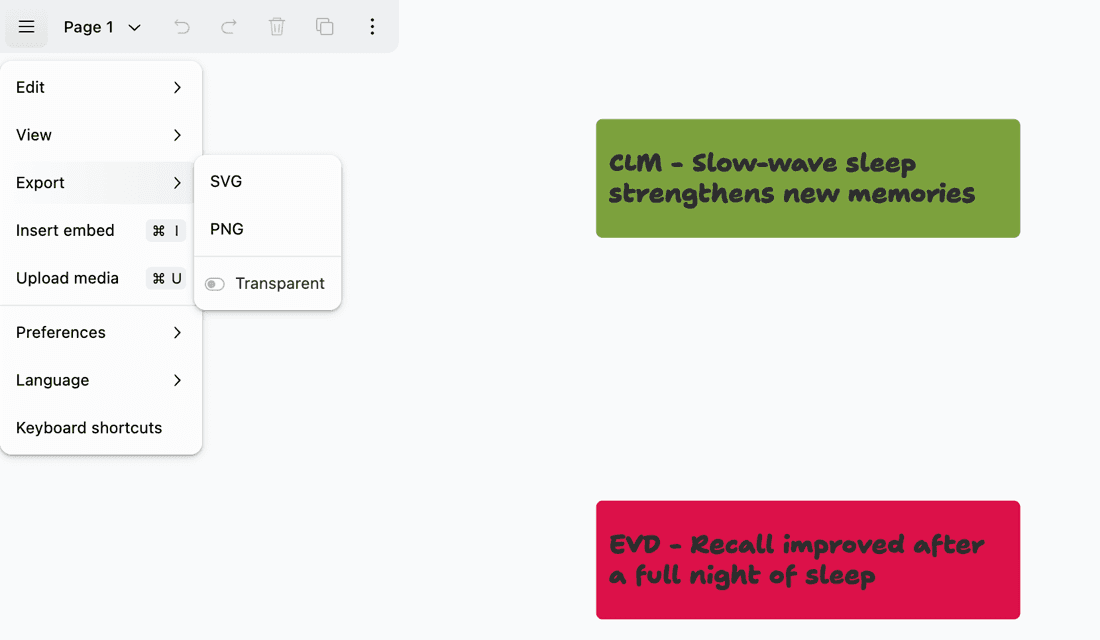
Export Options
- Markdown View: Switch to see the underlying markdown structure
- SVG Export: Export canvas as SVG image (via tldraw)
- PNG Export: Export canvas as PNG image (via tldraw)
Avoiding data loss
Editing in more than one place
An open canvas holds its own copy of the canvas in memory and writes the whole canvas back to the markdown file shortly after each change. It also watches that file, so a change written by another tab, another device, or a hand edit is merged into your open canvas as it arrives.
That merge works item by item — each shape, and each relation between nodes — and each item is merged as a whole rather than field by field. It is not full conflict resolution. If the same item is changed in two places at once, the version that reached the file first wins, and the later change to it is discarded. The rest of the canvas is kept.
Editing the same canvas on two devices that are offline or out of sync is the riskiest case. The two versions diverge across many items at once, so a large part of one device’s work is dropped — either your sync service picks a winner at the file level, or the merge replaces your items wholesale. Changes made on the losing device may be unrecoverable.
To keep your work safe:
- Edit a canvas in one place at a time. Close duplicate tabs, splits, and popout windows showing the same canvas.
- Let sync finish before you start editing on a second device, and check that the canvas shows your latest work before you change anything.
- Do not hand-edit the canvas data block, whether or not the canvas is open.
Use only one sync service
Running more than one sync service over the same vault — for example Obsidian Sync alongside iCloud Drive, Dropbox, or Google Drive — can duplicate, corrupt, or delete files, and canvases are no exception. Obsidian calls this double-syncing and does not support it.
If your vault sits inside a cloud storage folder, move it out or turn off the other service. See Troubleshoot Obsidian Sync for Obsidian’s own guidance.
Troubleshooting
Common Issues
Canvas Won’t Load:
- Check that the file has proper frontmatter with
tldr-dg: true - Verify the JSON data block is properly formatted
- Try switching to markdown view and back to canvas view
Relations Won’t Connect:
- Ensure the node types allow the relation type you’re trying to create
- Check your discourse relation configuration in settings, or add the relation type from the canvas (see Add a relation type from the canvas)
- Verify both nodes are valid discourse nodes
Canvas Is Missing Recent Changes:
- Check whether the same canvas is open in another tab, split, or window, and close the duplicates
- On a synced vault, confirm sync has finished on every device
- Check your sync service for a conflicted copy or version history of the file, which may still hold the missing work
- Confirm only one sync service is running over the vault (see Use only one sync service)
- If you saw the notice “Canvas file contains invalid data; your latest changes were not saved.”, the data block could not be read — check the file for a damaged or hand-edited data block
Performance Issues:
- Consider splitting large canvases into multiple smaller ones
- Close other resource-intensive applications
Search Not Working:
- Verify nodes have proper frontmatter with
nodeTypeId - Check that the Obsidian metadata cache is up to date
- Try restarting Obsidian to refresh the cache
Getting Help
If you encounter issues with the canvas feature, reach out to our dev team via Slack